Add or Edit Posts
Students can add and edit posts in their own portfolio. Teachers can add, edit and lock posts in any portfolio associated with their class site.
Add Posts
Teachers have two ways to add posts. They can "batch add" (or bulk add) a post to many portfolios at once (such as all the portfolios in their class), or they can add a post to only one portfolio. The basics of creating a post are the same, depending on the type of content. However, the buttons teachers access are different, see the topic Getting Started with Portfolios for an overview of the new Bulk Add feature.
There are several types of content you can add:
- Text posts
- Pictures
- Video
- Documents
Add Text & Rich Content
Regular posts can contain text or other rich content, such as documents, photos, video or audio.
To create a text post:
- Click the + button (either within the left navigation for a bulk add, or within the student's portfolio itself).
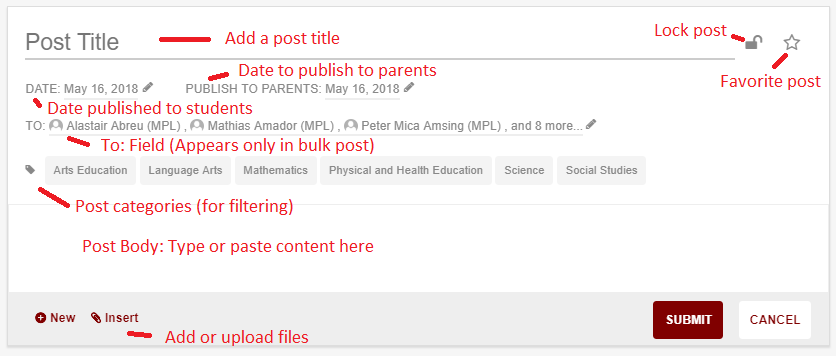
- Specify a Post Title.
- Click on the date to modify it. The date defaults to today on new posts.
- If you are creating a bulk post (to go to several students at once), add or remove names from the TO field.
- Select categories to organize and group posts e.g., specific subjects or curriculum areas. Learn more about categories.
- To prevent further edits by students, teachers can lock the post by clicking the padlock icon. New posts are unlocked by default.
- Click the star icon to favourite or showcase specific posts.
- Add text and other content to the text box.
- Files such as Video, Audio and Images can be added via the INSERT tab (visible when your cursor is in the Body field).
- Files such as PDF, Word, Excel or PowerPoint can be added using Upload File on the INSERT tab.
- Click the Submit button to save the new post.
Add Images, Videos or Documents
You can also quickly create a post by adding images, video or documents. It's a great option for mobile and tablet devices.
To quickly create a post:
- Click the appropriate Add icon (either within the left navigation for a bulk add, or within the student's portfolio itself). See the tables above for which buttons to use.
- Specify a Post Title.
- Specify a Description.
- Click on the date to modify it. The date defaults to today on new posts.
- If you are creating a bulk post (to go to several students at once), add or remove names from the TO field.
- Select categories to organize and group posts e.g., specific subjects or curriculum areas. Learn more about categories.
- Teachers can lock a post to prevent further edits by students by clicking the padlock icon. New posts are unlocked by default.
- Click the star icon to favorite or showcase specific posts.
- Click the Add button and select an image, video or document from your device or computer.
- You can also drag and drop files from your computer.
- On mobile and tablet devices you can access the camera roll, take a photo or record a video.
- Once you've added items you can re-order them by drag and dropping each item.
- Click the Submit button to save the new post.
Lightning Add
You can quickly add an image or video to a student post using the Lighting Add button. The image or video is appended to the end of the student post. ![]()
To append a video or photo to a post:
- From within a student's portfolio page, click the Lightning Add button. Image and video icons display over the student's posts.

- Click or tap on an icon. If you are on a tablet or smart phone, the Lightning Add button accesses the camera on your device. On a computer, the button accesses your folders to upload an image or video file.
- Take or upload the image or video.
Edit Posts
Teachers can edit student posts. If a post was "bulk added," they can also edit multiple posts at once. See "Edit Bulk Posts" below for details.
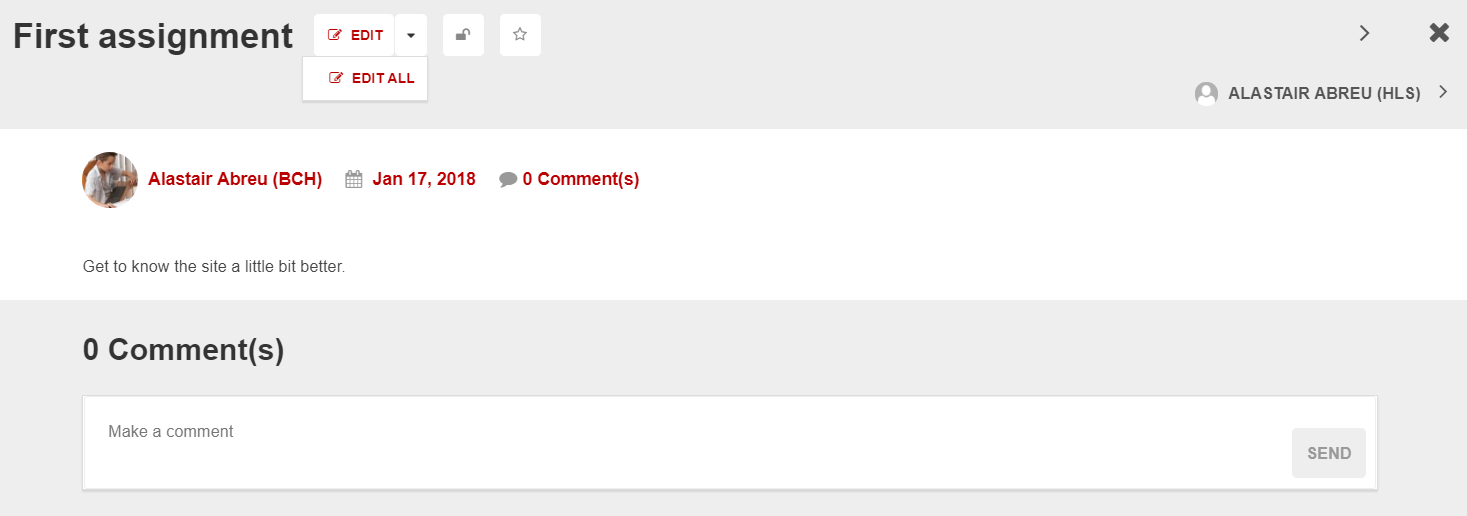
To edit an existing post:
- Click on a post to open the view window (screenshot below).
- Click the EDIT button. See "Add Text & Rich Content" above for editing options.
- Click the Submit button to save your changes.
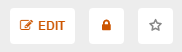
When viewing or creating posts, a teacher can lock or favorite a post. Students cannot edit locked posts.
Favorited posts allow a student or teacher to highlight their best work. View all Favorites for the current grade by clicking the Favorites (star button) from the post filter panel.
Edit Grade
If a teacher accidentally posts to the wrong grade, they can now fix it with the Edit Grade option.
To change the grade associated with a post:
- Click the drop-down arrow beside the EDIT button:
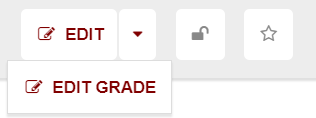
- Select EDIT GRADE.
- In the Move to Grade pop-up, select the grade you'd like to move the post to in the Grade drop-down:
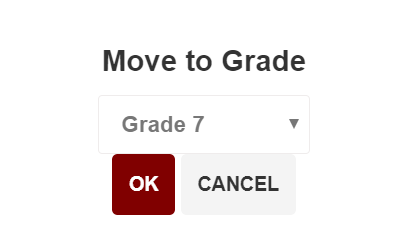
- Click the OK button.
Edit Batch Posts
If a teacher has batch-added a post to a class portfolio, they can also batch edit them. However, the batch post will overwrite any edits made by the students.
To edit an batch or bulk post:
- Click on a post to open the view window.
- Click the drop-down arrow beside the EDIT button and click EDIT ALL.
- Edit the post. See "Add Text & Rich Content," above, for editing options.

- Click the UPDATE ALL button to save your changes.
Tag or Categorize Posts
Categories are a great way to organize and find posts. Categories are shared across all portfolios in your district. Learn more about categories.
Publish to Parents
By default, when you publish a post, it will publish to everyone at the same time. However, you can delay a post's publication to publish it to parents at a later date. This field only appears if you have Parent Portal enabled.
To delay a post's publication to parents:
- When you create the post, change the PUBLISH TO PARENTS date to when you would like parents to be notified of this post.
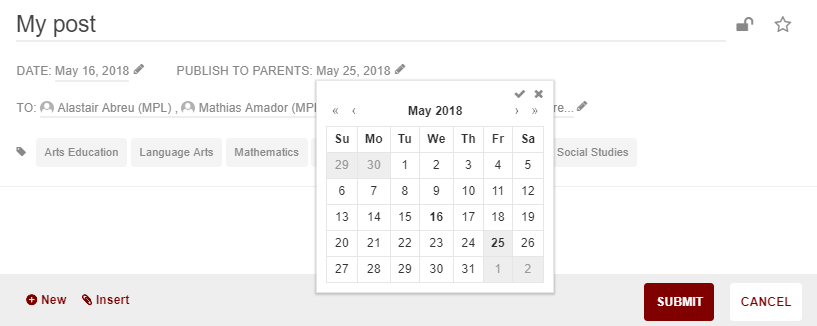
- Submit the post as usual.