Anonymous InfoPath Forms
To quickly create simple forms consider using the Form Viewer app. it's a great alternative if you're not ready to start working with InfoPath.
If you are using a complex InfoPath form which does not need anonymous access you can use the out-of-the-box InfoPath Form webpart found in SharePoint in the forms webpart category.
About Anonymous InfoPath Forms
This feature has a number of important functions:
- All the power of InfoPath Forms Services (Learn more about InfoPath Forms Services on Microsoft Office Help).
- Anonymous visitors can submit content (workflows will run in the background).
- Save content to another web application (e.g., save the submission from your website to your portal).
- Because it's an app, you can embed the form anywhere on a page (this also saves you the effort of recreating your site branding in InfoPath).
- Allows users to easily add attachments.
- Forms can include many different field types (such as input boxes or dropdowns).
- Display a form published to a library anywhere on your site.
The power of InfoPath lets you create complex and highly customized forms for just about any complex process you're already doing on paper, such as school registration.
Form Configuration (InfoPath)
Create the InfoPath form adding all needed fields. Do not create submit data connections or Publish the form. You will do that in the following steps.
Create the Submit Data Connection
- Click Data in the Ribbon and choose Data Connections

- Click Add.
- Select Create a new connection to Submit data > To the hosting environment and click Next.
- Enter a name for the data connection and click Finish.
- Ensure that the submit button uses the data connection that you just created.
Publish the Form
- Click the File tab, and select Publish > SharePoint Server
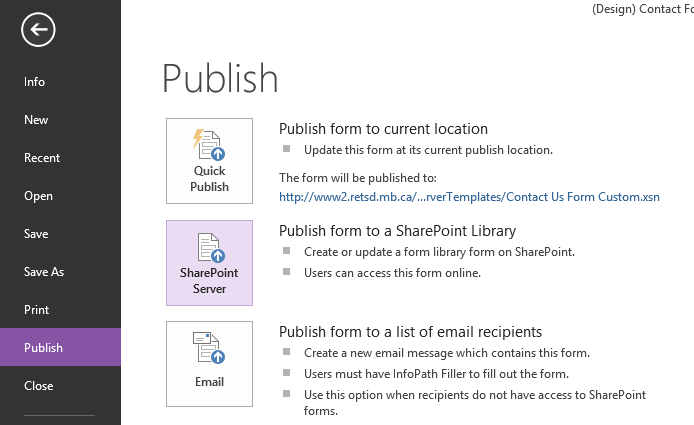
- Select the location to save your form template locally.
- Enter the URL of the SharePoint site to which you wish to publish this form, and click Next. You may need to authenticate.
- Select Site Content Type and then Next.
- If this is a new form, select Create a new content type and then Next, otherwise, select Update an existing site content type, find your content type in the list, select it, and click Next.
- Type a name and description for your content type, and click Next.
-
Type in the URL location where you wish to save the template, e.g., “http://www.scholantis.com/FormServerTemplates/TestForm.xsn”, and click Next.
- Add any columns which you wish to have displayed in the library, and click Next.
- Ensure that the information is correct, and click Publish.
Create & Configure the Form Library (SharePoint)
From the Settings Cog > Site Contents install the Form Library app to your site to store submitted forms. For instructions on how to install an app, see Install an App to a Site.
Follow the steps below to configure the form library for your needs.
Configure the Form Library
To configure the Form Library:
- Click Library Settings in the Library tab of the ribbon.
- Under Advanced Settings select Yes under Allow management of content types
- Ensure the Default open behavior is set to Browser and click OK.
Set Up Form Library Permissions
Depending on your needs you may need to manually modify the permissions for the library from the library settings page. From the Settings Cog > Site Contents find your list and under the Library ribbon tab you'll find Library Settings.
To modify the List Permissions:
- From the List Settings page select List Permissions
- Click Stop Inheriting Permissions
- Edit the permissions accordingly. Anonymous users should not have access to this document library unless you would like them to see the results.
- Ensure the user account you configured in the site collection settings has contribute or higher access.
Setup the Content Type
- From the List Settings page, under Content Types, choose Add from existing site content types.
- Find and select your content type, click Add and click OK.
- Click Change new button order and default content type.
- Uncheck all content types that are not your form content type and set your content type to position 1.
Add the Anonymous Form View App
To add the Scholantis Anonymous Form View app:
- On the top level (root) of the site, click the Settings Cog > Site Settings.
- Under Site Collection Administration, click the Site collection features link to access the Site Settings - Site Collection Features page.
- Click the Active button beside Scholantis Anonymous Form View.

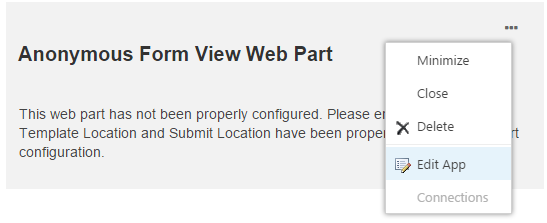
As with other apps, you can add or remove the Anonymous InfoPath Form View app by editing the page, selecting Add an App, and finding Anonymous InfoPath Form View Web Part under the Scholantis category of app. See Apps to learn more about apps.
Edit the Anonymous Form View App
Required Fields
| Setting | Description |
|---|---|
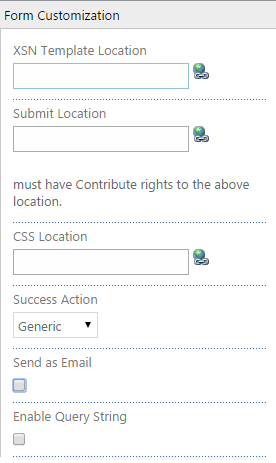
| XSN Template Location |
Specify the URL to the site content form template that was created in InfoPath. ie. /FormServerTemplates/TestForm.xsn |
| Submit Location | Specify the URL to the list where submissions will be saved. This is the document library was created in Library Configuration. ie. /TestFormLibrary/” NOTE: Do not include “Forms/AllItems.aspx”! |
Optional Fields
| Setting | Description |
|---|---|
| CSS Location | Specify the URL to a custom Stylesheet (.css) file to be applied to the form. Typically you can store this in a document library somewhere on your site, ensure public site visitors can access the file if appropriate. |
| Success Action |
Select the behavior for the form when a user submits data.
|
| Send as email |
Rather than use this option it is recommended to create a workflow in the document library which will send the email. To use this option additional fields need to be set up within the Infopath form and options are limited on what you can do. |
| Enable Query String | This is an advanced option. When selected, the webpart will use the "Query String Parameter" to read the query string value from the url. It will then fill that value into the form field specified by "Query String Form Field". |
Configure the Submit User for Form Submissions
The Form web part Submit User is used to save submitted forms and run workflows. It should not be changed unless required.
The user is shared by all Form web parts on your site which may need to be re-tested when changing this setting.
The user requires at least contribute permission to all destination form libraries.
To change the submit Username Go to the home page of the site and click on the Settings Cog > Site Settings > Anonymous Form view web part configuration listed under Site Collection Administration.
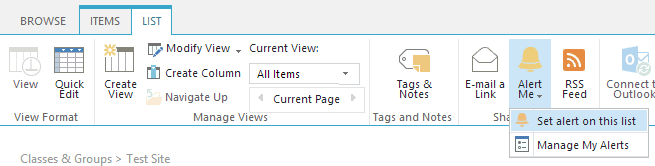
Create Email Alerts for New Items
Alerts can be created for any SharePoint list. From the Settings Cog (top right) select Site contents, select the list.
On the list page setup and manage your alerts using the buttons in the ribbon under the List tab.
Learn more on Microsoft Office help - Create an alert or subscribe to an RSS feed.
Export Submitted Data
Submitted data can be exported from your source list (Settings Cog > Site Contents) and using the Export to Excel option in the ribbon under the list tab.
This can be useful for exporting submitted information such as school registrations for review or submission to other systems.

Submit Forms to a Different Web Application or Site Collection
The submit to form library can be located on a different site collection. For example the form template can reside on the public website with a form library on your internal portal. This involves some extra steps to set up security and workflows, please contact [email protected] for help with this feature.