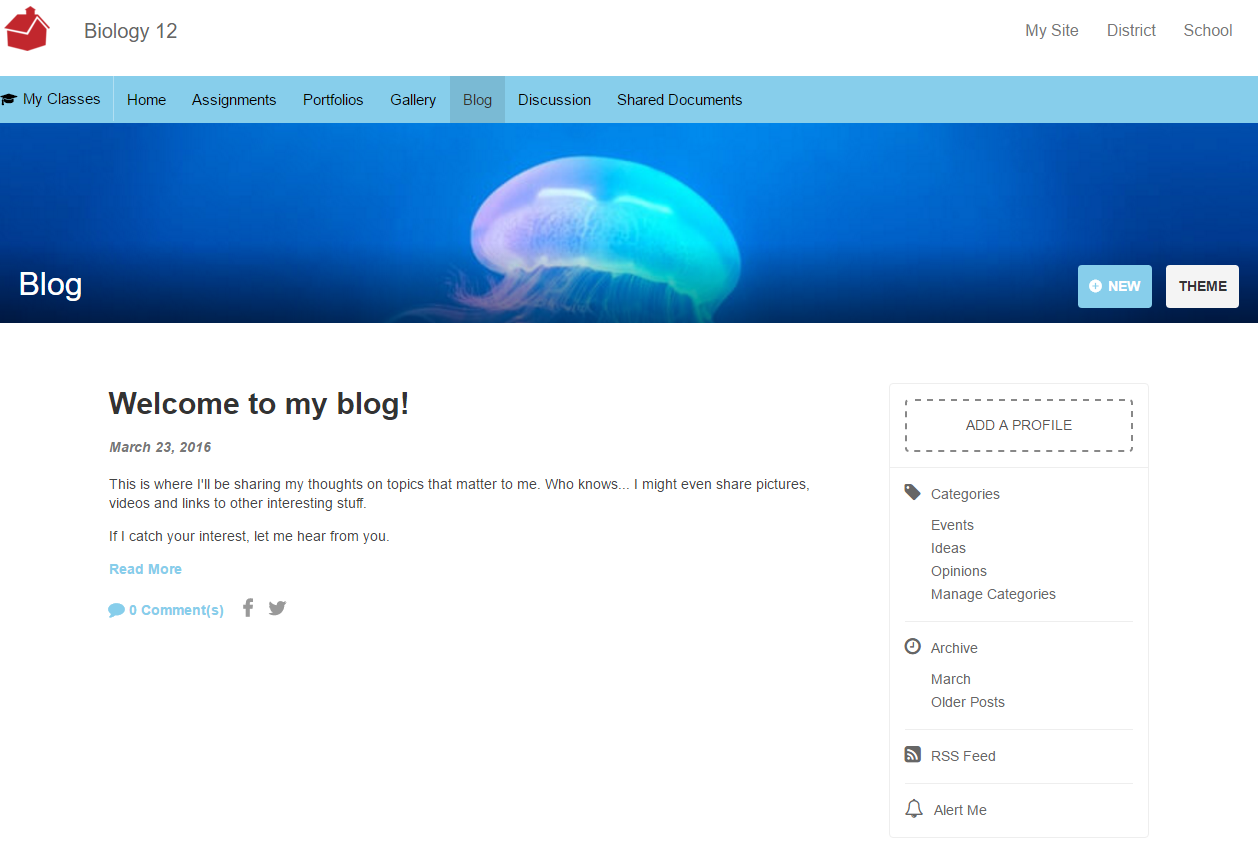
Blogs
About Blogs
Blogs can be created in many places on your Portal. Every Class or Group can have a blog, as can a district or school site. Teachers can add them to their public sites as well. Blogs can be a useful way to share information and interact with students and parents via the comments section.
Adding a Blog to a Website:
Although blogs work essentially the same on both our Web and Portal sites, they need to be added differently on the Web site.
To add a blog:
- Click the settings cog from the Utility links on the left side of the screen.
- Select Site Contents.
- Under Subsites on the Site Contents page, click the new subsite link.
- On the Site Contents: New SharePoint Site page, enter a title for your blog in the Title field. this title displays on your site menu.

- Enter a short phrase describing your site in the Description field (optional).
- Under Web Site Address, enter the folder name for your blog's URL, in the URL name field, such as 'blog' in the example above.
- Under Template Selection, you can choose a one column or two column format in the Scholantis tab.
- Click the Collaboration tab and be sure to select Blog.

- When you are done, click the Create button.
- Your site will be created. When it is complete, you will be directed to your new blog page so you can format it and create your first post.
Change the Look of Your Blog with a Theme
To add or change a theme on your blog:
- Click the THEME button

- Here you can configure your blog's appearance by using the following settings:
| Setting | Description |
|---|---|
| STYLE |
|
| TOOLBAR |
|
| TITLE |
Note: if the DESCRIPTION is set to HIDE, the Blog title displays in the title image. If it is set to SHOW, it will show below the Blog image (as shown below) |
| DESCRIPTION |
|
| BANNER STYLE |
|
| BANNER COLOR |
|
| BANNER IMAGE |
DEFAULT uses the theme image chosen from the images listed below. This keeps the same image throughout the blog. POST IMAGE uses the first image uploaded to the post and will display a different image for each post. If there is no image in the post, the default image will be used. |
|
NO IMAGE or CAMERA ICON |
|


- All changes are saved automatically. Once you have completed your changes, simply click the X icon on the top right to close the THEME settings.
Create or Update Your Profile
You can add a short bio and photo of yourself or include a brief introduction to your blog.
To add a profile:
- Click the ADD A PROFILE button to access the profile editor.

- To add an image of yourself, click the camera icon.
- Select an image for yourself and click the Open button. Your image will upload and resize to fit the space provided.
- Enter some introductory text about yourself. When you are done, click the checkmark icon.
- Your profile displays on your blog.
Delete a Profile
To delete your profile:
- Click the trashcan icon beside your profile photo.
- In the confirmation dialog box, click the OK button.
Create a New Blog Post
To create a new blog post:
- Click the NEW button on the blog banner.

- Enter a title for your post, in the Post Title field.
- In the DATE field, select a date from the calendar which you'd like the blog post to go live, then click the checkmark icon. Tip: Leave today's date, to have the page display as soon as it is published. Choose a future date to schedule a post.
- Choose a Category for your post:
- In the CATEGORIES field, click Select Categories to choose a category.

-
- Click the checkbox beside the category you would like, then click the ADD button. Remove a category by deselecting it.
- Click the X icon to close the Select Categories dialog box.
- Enter your content into the Post body field.
- To upload images to your blog, click the Upload link.
- You can also copy files from OneDrive, Shared Documents, Handouts & Materials (Class/Groups), Media Gallery (Class/Groups), Office 365 or Google Drive, by clicking Copy From...

- If you would like to save a draft, in the STATUS field, choose DRAFT to simply save the post as a draft. Then click the SAVE button below your post. Only site Owners and Contributors can see draft posts.
If the DRAFT button is missing, please contact Scholantis to change the content approval settings on the Blog.
- If you would like to publish your post, click PUBLISH, in the STATUS field, to view the PUBLISH button. Then click the PUBLISH button, Your post will be visible on the date chosen in the DATE field.
More About Blogs
- Blog posts are Archived by date. Archives are listed on the right side of each blog page.
- An RSS Feed button and an Alert Me button appear at the bottom for easy feed updates.
- Clicking within the body of the blog post opens the Formatting Ribbon ribbon with the EDIT, FORMAT TEXT, and INSERT tabs. For more information, see the Formatting Ribbon in the topic, Edit Content.
Edit Blog Posts
To edit a blog post:
- Open the blog post by clicking on it.

- Click the Edit button.
- Edit the post as shown in Create a New Blog Post
- Click the PUBLISH (or SAVE) button to publish (or save) your changes
Delete a Blog Post
To delete a blog post:
- Click the Edit link at the bottom of the blog post that you wish to delete.
- Click the Delete link to delete your post.
- Click the OK button in the dialog box to confirm your deletion.
Create a Category
Categories are ways to organize your blog posts. Linking a blog post to a category makes it easier to find similar posts.
To create a category:
- Click the Manage Categories link to access the Categories page.
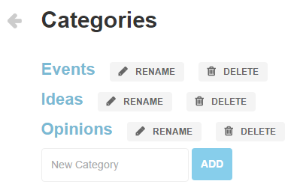
- Type a category name in the New Category field.
- Click the ADD button.
The new category will now be available under the list of Categories on your blog.
Edit or Delete a Category
To rename or delete a category:
- Click the Manage Categories link to access the Categories page.
- Click the RENAME button to rename a cateogory.
- Click the DELETE button to delete a category.
Blog Settings
The Blog settings allow you to edit your blog settings using a Blog Settings link. At present, you can use this to configure the comments on the blog.
Turn Off Blog Comments
By default, blog comments are set to BUILT-IN, meaning that anyone who is logged into your portal can comment on the blog.
To turn blog comments off:
- From within your blog, click the Blog Settings link to access the Comments settings.
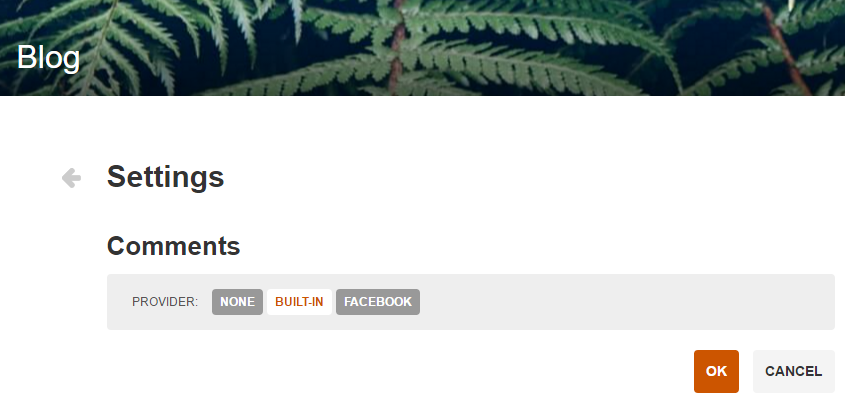
- Beside PROVIDER, click NONE.
- Click the OK button.
Enable Built-in Blog Comments
Built-in comments allow anyone logged in to your portal or website to post a comment on your blog.
To turn Built-in comments on:
- From within your blog, click the Blog Settings link to access the Comments settings
- Beside PROVIDER, click BUILT-IN.
- Click the OK button.
Enable Facebook Comments
If your blog is publicly available on the internet, you can enable Facebook comments, allowing users who are not on your portal to comment using their Facebook ID. You can also moderate Facebook comments.
To turn Facebook comments on:
- From within your blog, click the Blog Settings link to access the Comments settings.
- Beside PROVIDER, click FACEBOOK.

- To add a moderator account, enter the numeric ID for the Facebook account into the MODERATORS field. For how to find this, see Facebook ID.
- Click the ADD MODERATOR button.
Although adding a moderator is recommended, it is not required. Multiple moderators can be added.
- Click the OK button.
Moderation link not showing?
The Facebook comment moderation link will not appear immediately. You will need to wait for Facebook to update their settings. You can Fetch new scrape information immediately by entering your blog's URL on the Facebook developer website. Then pressing Debug.

Student Blogs
Students create and access their blogs from their individual My Site pages. Teachers can create blogs for all the students in their class or group. To create blogs for all of the students in a class enable the Student Blogs feature from SETTINGS, via Site features. Add and remove students from your class from SETTINGS, via the Access option. Enabling Students Blogs will also enable Student List feature used to access each of your student's blogs.
If a student already has a blog, that blog will simply be linked from the Student List on that class or group site. Teachers can edit, contribute and see draft posts on any student's blog. Students can only comment on each other's published blog posts, drafts are not visible to other students. When a student comments on a blog, the teachers who have the student in their classes will receive a notification about the comment, so they can monitor comments, if desired. Blog posts can also be copied to a student's Portfolio using the Copy to Portfolio button on the student's blog page.
If you are a teacher and cannot see drafts, please contact Scholantis to change the content approval settings on the Blog.