Create a Class or Group Site
Both Classes and Groups are created from the My Site page via the Create Class or Create Group button.
About Class and Group Sites
Though similar, Class, Group and Public sites have different purposes and offer different features. Visit the links below to learn about how to create and customise your sites:
About Class Sites
About Group Sites
Group sites are for any groups that would like to collaborate outside of class. Group leaders create their group sites and students/participants request to join online. Any staff member can create a group.
Create a Class or Group Site
To create a class or group site:
- Navigate to your My Site - Home page.
- Click the Create Class button to create a class site.
Or - Click the Create Group button to create a group.
- A pop-up displays asking you for the site title:

Choosing a Title
Selecting a good title makes your site easy to find (for example, Grade 8 boys baseball, Grade 9 Chemistry - Section 2). Classes can be searched by grade or course name.
- Click the CREATE button to go to the Setup page.
Setup Page
Here, you can customize your site's logo and colour scheme. If you leave the default colour scheme and logo you can still edit it later. For more information, see the topic Manage a Class or Group Site.
- On the Setup page, select one of the images provided or upload a logo for your site by browsing and uploading a picture.

- Below the images is a colour palette. Click on a colour to select what colour you'd like your site's navigation to be.
- Once you have chosen your color scheme and uploaded an image, click the NEXT button to save your changes and continue creating your site.
Features Page
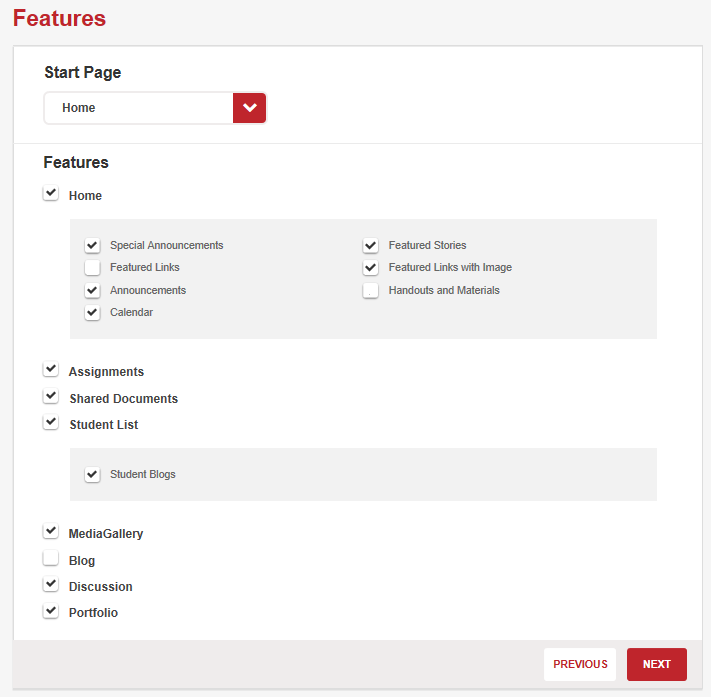
- On the Start Page drop down, select the page site visitors should see first. The Feature checkboxes you select below determine what your choices will be on this drop-down, so you may want to select the Features first, then come back to determine your start page.
- Select from the available class or group site features. Features can be enabled or disabled at any time without losing your data.
Access Page
On the Access page, you can set the different permission levels for the site. Permission levels allow you to determine who can do what on your site.

Class sites have: Readers, Students, and Teachers, while group sites, have Readers, Contributors, and Owners.
- Readers have read-only access, meaning they can only view your site. Readers can comment on blog posts. Note: If you choose Public (Anonymous), your site will be visible to everyone on the Internet.
- Students or Contributors can add content to the site, submit assignments, blogs, edit the wiki, or participate in discussions.
- Teachers or Owners have full control of your site. They can add and remove content, enable features or format the site. This is useful for substitute teachers, or co-taught classes. You can't remove yourself but a co-owner or co-teacher you add can do that for you.
Readers
In this section, you can control who can view your site. You can add individual users or groups. There are three levels of Reader permission for Class sites and four levels of reader permission for Group sites:
-
Public Access - Gives permission to anyone who has the address for your site to access it and read the public areas
Public Class Sites
Enabling public access is useful for parents, e.g., readers can see announcements, events and assignments, but not student contributions.
Once public access is enabled, any places where students can add information (or their names can be seen) is still private. On class sites, shared documents, wikis, discussions and blog comments are hidden from anonymous visitors.
Portfolios, the student list, student blogs, discussions, assignment submissions are not open to public visitors.
- All Students - Allows all students to view the site.
- All Teachers - Allows all teachers to read announcements, events and assignments.
- All Staff (Groups only) - Allows all staff to read announcements, events and assignments.
To add individual readers click the ADD button and search by name, username or email address.
Students & Classes (Class)
Students can participate in discussions, comment on the class blogs, and submit assignments.
On class sites we recommend leaving the default access, All Students, this avoids the need to add students individually. Students can easily find and follow your class to start contributing.
To add individual students click the ADD button and search by name, username or email address.
Add ClassesIf your school has enabled Scholantis SIS Data Sync you will see a list of classes from your Student Information System when adding students (Look for the graduation cap ![]() ).
).
Adding a class from your SIS synchornises your class site enrolment with your Student Information System. Every night students are automatically added or removed from your class site. New students are added as followers to your site so it appears on their My Classes list, and a blog or portfolio will be created (if enabled on your class).
Add all students in a class from the Add Student & Classes area:
- Click the + ADD button beside the name of the class to add all the students in the class.
- View the individual students in a class by clicking the down arrow

Contact your school's technology support team if any warnings are dispayed next to student's names.
If your school has enabled Scholantis SIS Data Sync you will also see any co-teachers class names when adding students or classes.
Save
Once you have set permissions for your site, click the FINISH button to save and open your site.
Followers
Adding individual users or classes will automatically make them a follower of your site. The site will then be listed under their My Classes or My Groups. Adding a group of users will not make them a follower of your site.
Delete a Site
To delete a site:
- From the Utility links of your class or group site, click SETTINGS to activate the Settings menu.
- Select Setup from the Settings menu to go to the Setup page.
- Click the DELETE SITE button to access the confirmation page:
